|
<< Click to Display Table of Contents >> Install and Start Rserve |
  
|
|
<< Click to Display Table of Contents >> Install and Start Rserve |
  
|
❖Recommended installation method
(1)For the Yonghong Z-Suite installed in Windows, a Linux virtual machine is recommended for installation.
Install a Linux virtual machine, in which R and Rserve are already configured. You only need to start Rserve. For details, see "Installing and Enabling Rserve on a Linux Virtual Machine."
(2)For the Yonghong Z-Suite installed in Linux, the docker mirror service is recommended for installation.
Install docker on the Linux and download the docker mirror of R. The mirror has centos7 inside that already contains R and Rserve. You only need to start docker and then Rserve. For details, see "Installing and Enabling Rserve in Docker Mode."
The above two methods are recommended, and other conditions include:
(1)Your Linux does not support docker. The docker requires that the Linux kernel version be later than 3.10.
R (including relevant dependent packages) also needs to be installed. Then install the packages of the third party. For details, see "Installing R Directly."
(2)Configure R directly in Windows.
You only need to copy relevant resources and configure environment variables. For details, see "Installing and Enabling Rserve in Windows."
❖Installing and Enabling Rserve in Windows
Operation steps:
1、Copy the R folder to your PC.。
2、Configure environment variables for the system.
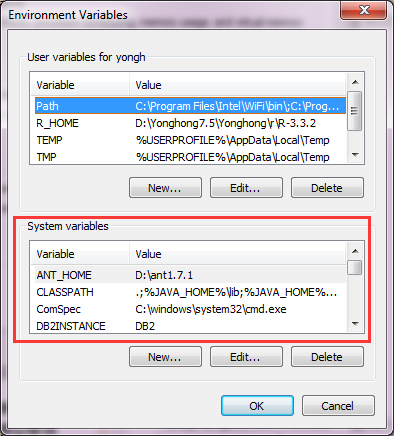
Right-click "My Computer" and choose "Attribute" from the context menu. In the displayed dialog, choose "Advanced system settings" → "Advanced" → "Environment Variable" → "System Variable."

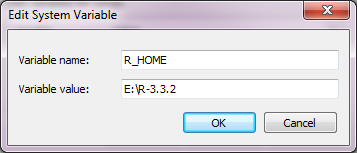
Create a variable named R_HOME and with the value of R-3.3.2.

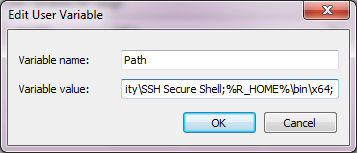
Edit the variable Path by adding ;%R_HOME%\bin\x64; behind the variable value.

3、Run Rserve on the background.
Access the rserve folder from the console and run start /b Rserve.exe.

❖Installing and Enabling Rserve on a Linux Virtual Machine
Operation steps:
1. Unzip centos7.zip.
2. Install the VMware.
3. Enter the BIOS of the operating system and enable the virtual machine in security.
4. Start VMware and open the unzipped virtual machine.
5. Disable the firewall: systemctl stop firewalld.service
6. Start Rserve remotely: R CMD Rserve --RS-enable-remote
❖Installing and Enabling Rserve in Docker Mode
System requirement: centos7
Linux kernel version: later than 3.10
Installation steps:
1. Install docker:
yum install -y docker
2. Disable the firewall:
systemctl stop firewalld.service
3. Start docker and enable it to start automatically as the PC starts:
systemctl start docker.service
systemctl enable docker.service
If the system doesn't support above two commands, then use the following two commands. If successful, do to step 3 directly.
service docker start
chkconfig docker on
4. Put centos_r.tar in the Linux machine.
5. Import the mirror in:
Run docker load --input centos_r at the same level of directory.
6. Run the mirror:
docker run -ti -p 192.168.20.191:5000:6311 yonghong/centos_r:1.0 /bin/bash
This instruction is to map port 6311 on which the R in the docker runs onto port 5000 on the Linux machine and enter the inside of the docker container. The red text indicates the IP address and port number of the local PC, that is, IP address:port number.
7. Validate the environment variables.
Source /etc/profile
8. Start R:
R CMD Rserve --RS-enable-remote
9. Press Ctrl+P+Q to exit the container, and then run docker ps to check the running status. R should still be running.
❖Installing R Directly
System requirements:centos7,
Java environment is already configured (including JAVA_HOME, PATH, and CLASSPATH)
Installation steps:
1. Download R-3.3.2.tar.gz
2. Unzip to R-3.3.2,tar -xzvf R-3.3.2.tar.gz
3. Add dependent packages:
yum install -y gcc
yum install -y gcc-c++
yum install gcc-gfortran
yum install -y glibc-headers
yum install -y readline-devel
yum install -y wget libXt-devel
yum install -y fonts-chinese tcl tcl-devel tclx tk tk-devel
yum install -y mesa-libGLU mesa-libGLU-devel
yum install -y install bzip2-devel
yum install -y install xz-devel.x86_64
yum install -y install pcre-devel
yum install -y install libcurl
yum install -y install libcurl-devel
yum install -y texinfo.x86_64
yum install -y texlive-pdftex-doc.noarch
yum install -y texlive
yum install -y openssl-devel
yum install -y libxml2
yum install cairo-devel.x86_64
4. Access the R-3.3.2 and install R.
./configure --enable-R-shlib=yes --with-tcltk --prefix=/home/R
--prefix is the address for installing R. It is the R folder at present.
5. make and make install.
make
make install
6. Configure environment variables.
Edit variables:vim /etc/profile
Add variables:export R_HOME=/usr/local/R/lib64/R
export PATH=$PATH:$R_HOME/bin
Validate variables:source /etc/profile
7. Input R into the R console in xshell。
8. Install the R language package:
install.packages("flexclust")
install.packages("Rserve")
install.packages("rpart.plot")
install.packages("Cairo")
install.packages("arules")
install.packages("arulesViz", dependencies=TRUE, INSTALL_opts = c('--no-lock'))
install.packages("glmnet")
install.packages("forecast")
9. Close the firewall:systemctl stop firewalld.service
10. Start Rserve(remote mode is allowed):
R CMD Rserve --RS-enable-remote
•Solution of part of false information
1. make: *** [read.o] Error 1
ERROR: compilation failed for package ‘png’
Solution:yum install libpng-devel
2. If igraph is not installed
Solution:Download igraph_1.0.1.tar.gz and install it offline by using the instruction of R INSTALL igraph_1.0.1.tar.gz.
3. If rJava fails to be installed
Solution:Run R CMD javareconf on the shell terminal. The prerequisite for the solution is that the system Java environment is correctly configured, including the environment variables JAVA_HOME, PATH, and CLASSPATH.
4. zlib>1.2.5 no
1)Download and unzip zlib1.2.8 to /usr/local/src/.
2)Check the zlib installation file rpm -ql zlib. The library file is in lib64.
3)Configure zlib: ./configure --prefix=/usr/local/zlib/.
4)Compile the file using the make command.
5)Uninstall zlib. If zlib is uninstalled before this step, the previous step will fail. The uninstallation command is rpm -e --nodeps zlib. After the uninstallation is complete, the library file of zlib, namely libz.so*, disappears from /lib64/.
6)Install zlib using the make install command. After the installation is complete, a lib directory that contains the library file of zlib appears in /usr/local/zlib/.
7)If you use the Yum, the tool will prompt that libz.so* is not supported. Therefore the current shared library file must be registered to the system. Open /etc/ld.so.conf and add /usr/local/zlib/lib/ in it, and then save and exit.
8)Update the cache using the ldconfig command. Use the Yum again at this moment and you will find that the operation becomes normal, which means that zlib is updated successfully.