|
<< Click to Display Table of Contents >> Import Incremental Data to Data Mart |
  
|
|
<< Click to Display Table of Contents >> Import Incremental Data to Data Mart |
|
Import Incremental Data to Data Mart:Generate data mart files on a regular basis based on certain conditions
When execute"Import Incremental Data to Data Mart", corresponding folders and file prefixes will be generated in cloud folder with the same level of bihome by default. Illustrate with actual examples. Since the data in the database may be changed, the user can create incremental import data tasks, monitor the data in specific data set at eight o'clock every day so that the user can handle timely. After setting the task, files with specified file prefix can be generated to a user specified folder at eight o'clock every day. This file is loaded with database query information through which the user can understand the data changes. .
Statements |
Description |
|---|---|
dc.node.types=narc |
Specifying the data mart node type of the machine.They are n-Naming node, m–Map node, r-Reduce node and c-Client node respectively. It's usually a combination of these values. nmrc refers that the node of the machine is the combination of all types. This attribute is mandatory. The value is the combination of these types.
|
dc.fs.naming.paths=c\:/bihome/cloud/qry_naming.m |
Defining and naming the node storage metadata. The file path can be either an absolute path or a relative path of relative bihome. For example, “/cloud/qry_naming.m” refers to qry_naming.m file in the cloud directory under relative bihome directory. This attribute is mandatory. |
dc.fs.sub.path=c\:/bihome/cloud/qry_sub.m |
Defining the Map/Reduce node storage metadata. The naming rules are the same as above. This attribute is mandatory.
|
dc.fs.physical.path=c\:/cloud |
Defining the Map/Reduce node storage physical data.The naming rules are the same as above. This attribute is mandatory.
|
dc.io.ip=192.168.1.99 |
Defining the IP of this machine, especially when in multiple network cards.
|
➢Description:The user needs to change c\:/cloud to the user's own path, and change the IP to the user's host IP address.
The steps to create new "Import Incremental Data to Data Mart" are as follows:
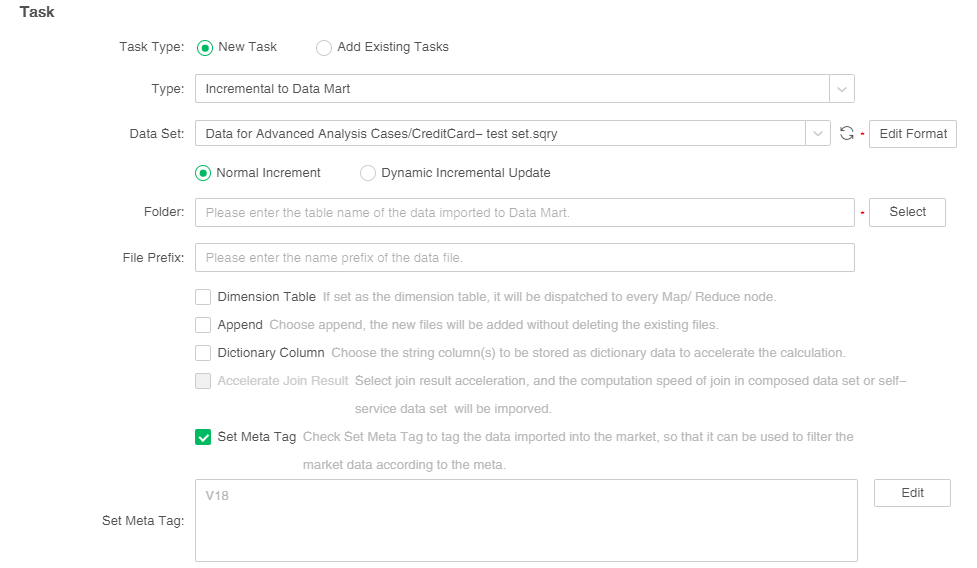
1. In the task area of the new job or the New Task screen, select the task type "Incremental to Data Mart" as shown in the figure below.
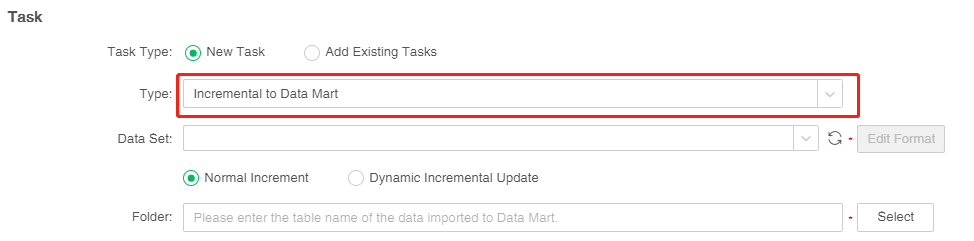
There are two ways to incrementally import data : "normal increment" and "dynamic incremental update", and the default is "normal increment". "normal incremental" is to import the full amount of data or additional data into the data mart; "Dynamic incremental update" can not only update the historical data in the data mart according to configuration time, but also add new data into the data mart.
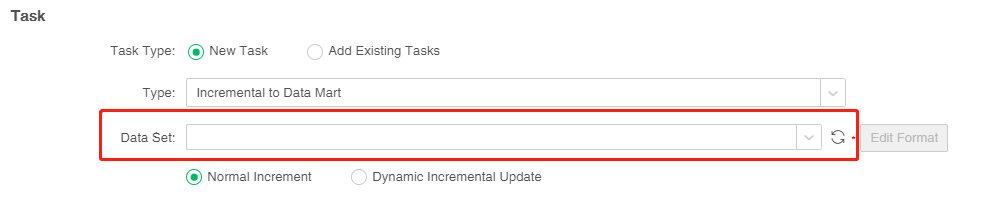
2. Data set, select the data set to be imported into the data mart, it is required. You can click "Refresh Data Set" to synchronize the data set list. When the method of incremental data import is "normal incremental", the user can select all data sets in the data set drop-down list; when the method of incremental data import is "dynamic incremental update", the user can only choose data sets that can be pushed down to the database for execution.
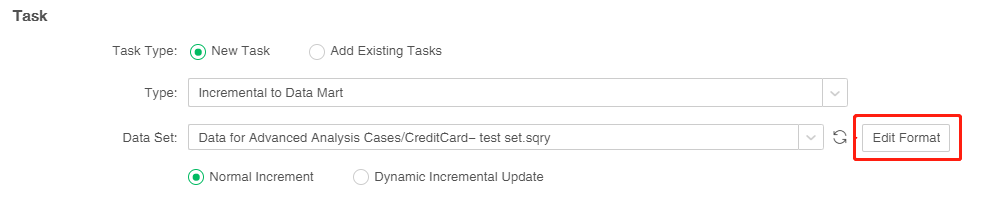
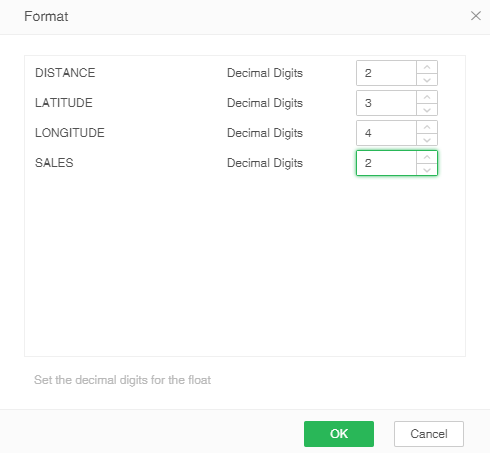
3.In version 8.5, we update the data precision so that there is no precision problem when calculated large amounts of data, the number of precision bits supprot setting. Click the Edit Format button on the right side of the dataset to display the double, float type data columns in the dataset, and set the storage precision on the market folder. Different market folders can have different precisions, Double, float type data column default value is 4,as shown in the figure below.
4.Enter the name of the data mart folder generated by incremental import data or select the generated data mart folder. It is a mandatory item. When the user enters or selects an existing data mart folder, the system will specify duplication prompts based on whether it is Append or not to prevent the user from covering the existing data mart folders in unknown situation, deleting the existing data mart files which will lead to data loss. As shown in the figure below:

5.Set the name of the file that will be used to generate "Incremental Import Data to Data Mart".

6.Set other attributes of normal increment.
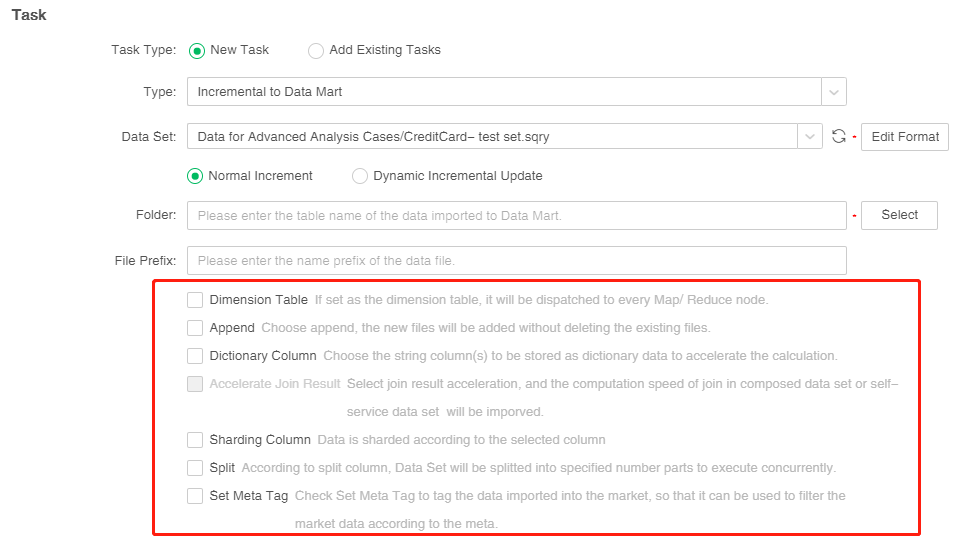
Yonghong Desktop only supports Append,Split and Set Meta Tag.
[Dimension table] When the user clicks Dimension table, for star data of distributed system (one large table and several small tables), the data in small tables can be duplicated to each Map Node. Execute Map side join to improve data reading and processing speed.
[Append] If you select this, the generated data mart file names will be sorted. If the user creates an incremental import data task, that is, collect the data of certain data set at 8 o'clock to generate a data mart file. A file named test 0 will be generated at the first day, and a file named test 1 will be generated at the second day, and so on.
If the user doesn't click Append, and if the mart folder exists in current system, a new data mart folder will be created instead. If the user creates an incremental import data task, that is, collect the data of certain data set at 8 o'clock to generate a data mart file. The files generated at the first day will be put to folder 0, and a new data mart folder folder0 will be generated at the 2nd date to cover existing folders and files.
[Dictionary Column] When the user chooses to store string columns in a dictionary data format, the system will map the specified string column to Numerical data. The calculation and grouping of string column are carried out via numeric data thus to speed up the treatment and reduce memory occupation. When the system returns to the final result, the numerical value will be reduced to corresponding string.
[Accelerate Join Result]When two or more data sets are joined and incremental imported into the mart, check the "Accelerate Join Result" option to transfer the join calculation from the client node to each map node, reduce the memory pressure of the client node and improve the operation efficiency.When the composed data set and self-service data set meet the conditions, the "Accelerate Join Result" option can be checked. If the conditions are not met, it will be grayed out, not optional. See details:Data Mart>ETL>Pull Data from Data Source>Accelerate Join Result
[Sharding Column] The data column is stored in a consistent hash mode. When the user checks the fragmentation column, the fragmentation column dialog box will pop up automatically.
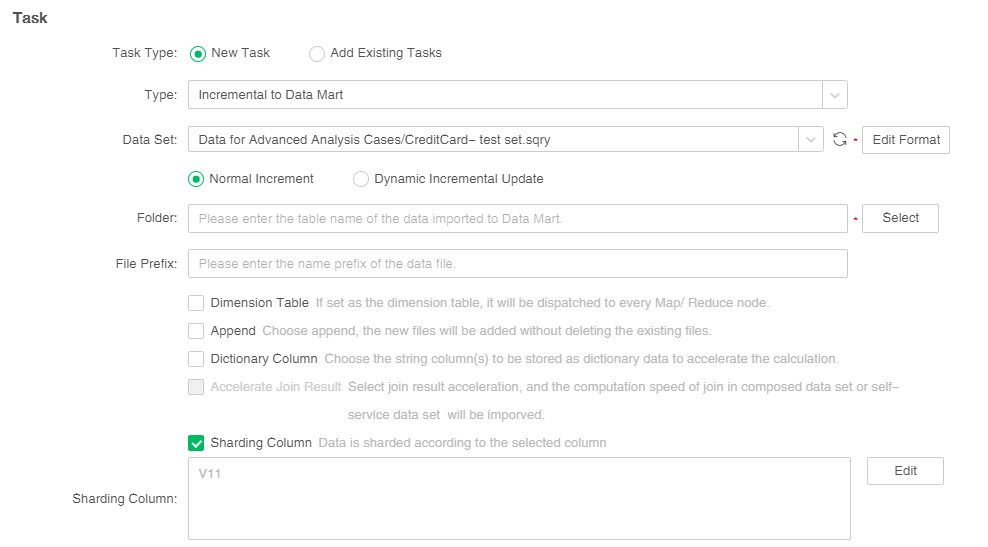
When two data sets are imported into the market incrementally, the number of columns is selected after checking the fragmented columns; when the types of columns are matched, the fragmentation is used as the link condition, and the Mapsidejoin can be realized in combination.
[Split] Implement split by column, and import the data to the mart in parallel. When the user clicks partition, partition dialog box will pop up automatically. Split type includes "Split by Average" and "Split by Group". Only one split column can be chosen for "Split by Average", and the split number should be integer.The default is automatic splitting, and the number of splits is input by the user, The default is 4,as shown in the figure below.
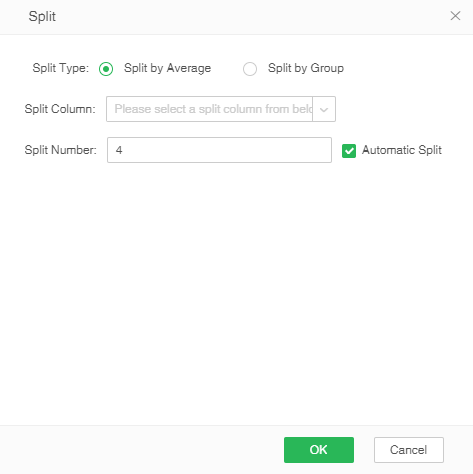
When canceling the automatic splitting, the user can manually input the split value. The manual splitting is to group the data according to the split value, and then the grouped data is stored in zb, and the number of zb is set to divide the number of copies, and it is necessary to pay attention to the input form. When dividing the value, if the number of split values exceeds the range of [n-1, n+1], click the OK button and the prompt message is as follows: The custom split value can only be set in [n-1, n+1] For the range, delete the split value of the number of extra lines.
As shown in the figure below, divide the Double column and divide it according to Double<3 ; 3≤ Double ≤8 ; Double>8 ; Double is empty, and divide the number of copies into 2 copies.

For example: 3. "Split by Group" cannot fill in the split number. You can select multiple split columns. In order not to impact the efficiency of importing data, suggest that the number of split column is no more than 10. "Split by Group" can automatically generate Meta information to facilitate data filtration in data mart. Where, the key in Meta is the corresponding column name of split column, and the value in Meta is the corresponding value of split column. When the user does not click split, the data mart files will be generated according to the system default settings.
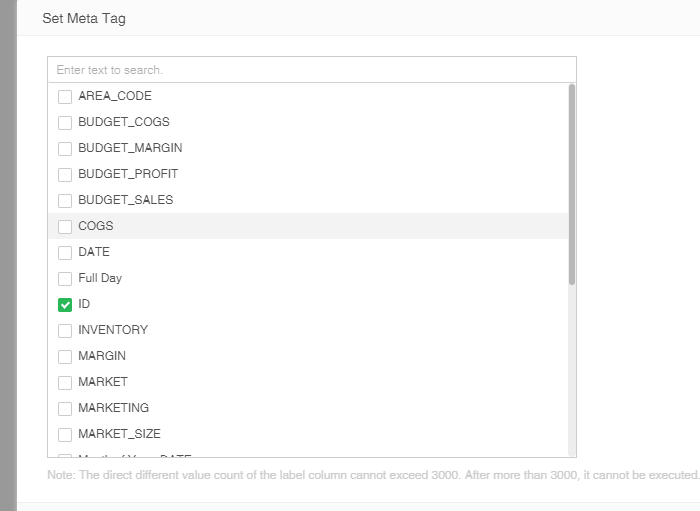
[Setmeta] In version 8.6, we added the attribute of setmeta to incremental import data, which is used to label the specified columns of the data set entering the mart. At the same time, we solved the problem that when the SQL load of the data set is slow, using the method of grouping and splitting to type meta will make the job run too long.
Before version 8.6, we could only label the data set entering the market by group segmentation. However, due to the problem of segmentation implementation mechanism, when the SQL execution time of the data set itself is relatively long, segmentation will increase the consumption of resources and prolong the running time of the job. After 8.6, the setmeta attribute is introduced to solve this problem. The restriction condition of using setmeta is the same as that of grouping segmentation (the total number of data rows / different values of data segmentation columns > 262144 rows), and the effect is consistent with grouping segmentation. However, when the SQL running time is short, setmeta will not accelerate the job running like the grouping segmentation. Only when the SQL running time is long, the running speed of setmeta will be less than that of grouping segmentation.
The specific operation steps are as follows:
1) Create a new incremental import task in the scheduling task, and check the setmeta attribute
2) Check the column to be labeled and click OK
7. Set the properties of dynamic incremental update, as shown in the following figure:
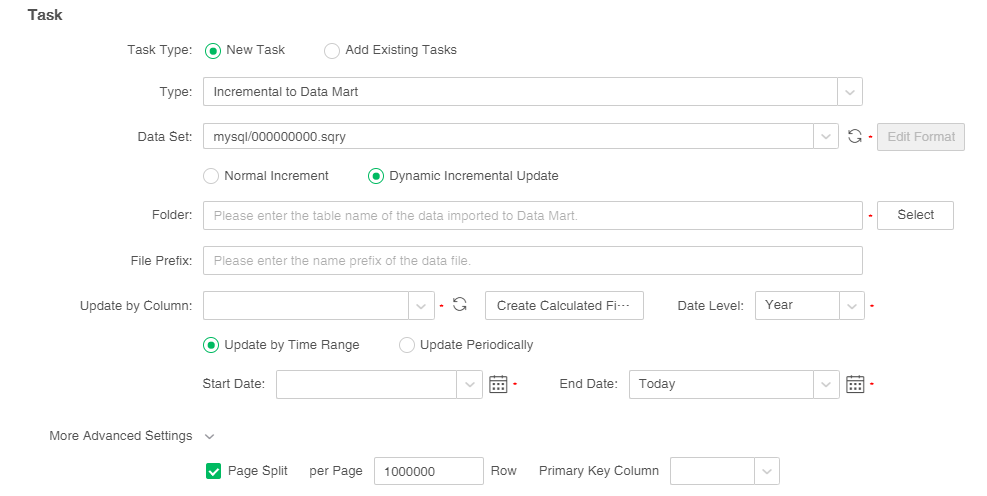
[Update by column] The update by column can only be of date type or timestamp type, which is required. The user can select the original column of the data set or create a new calculated column, but only one new calculated column can be created. After the new calculated column is created, the calculated column can be edited. You can click "Refresh Update by Columns" to synchronize the columns of the data set.
[Date level] The date level includes year, quarter, month, week and day. The default is year, which is required. After selecting the date level, the bazaar file will be generated according to the selected date level.
[Update by time range] Set the start date and end date of the market data to be updated, which is required. Start date and end date can be selected as built-in parameters of today, yesterday, this week, last week, this month, last month, this quarter, last quarter, this year, and last year, or you can select a specific time.
[Update periodically] Set the period of time to update the market data, the default is from the past 3 years to today, which is required.
[More advanced settings] After expanding more advanced settings, users can use page splitting, which is not checked by default. When the database used by the data set supports paging, and the amount of data in the data set is large and needs to be quickly split into the market, you can use paging splitting. After checking the page split, you can sort by the primary key column in descending order and each page is paged by 1000000 rows by default. The primary key column is the update basis column by default, and users can set the number of rows per page and the primary key column according to their needs. Databases that support paging include: MySQL, Oracle, DB2, SqlServer, Gbase8a, Kylin, SysbaseIQ, Hana.
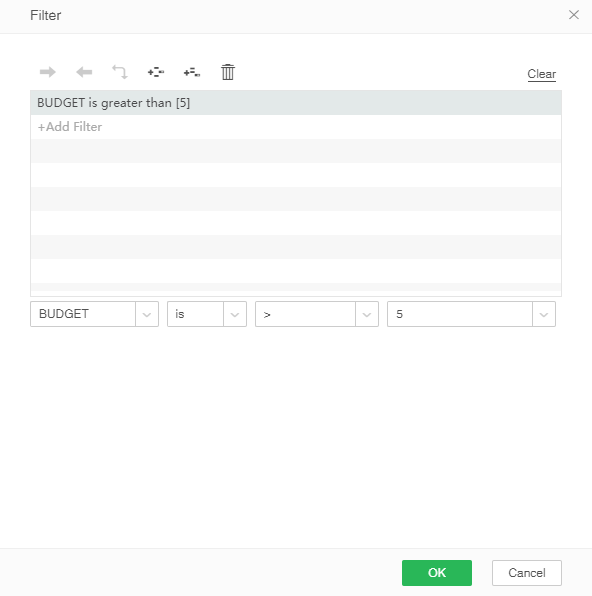
8. Click to add filter condition. Click [Edit] button to pop up the filter dialog box, click to increase the filter conditions, select the column that needs to set the filter, as shown below. The system will only perform incremental import actions on data that meets the filter criteria.

9. Users can control the incremental import data through scripts. The user can set the names of the data mart files and data mart folders, pass parameters, append, and set properties of the data mart files through scripts. When this task is performed, the script has the highest priority.
Script statements |
Description |
Example |
|---|---|---|
folder |
Create a data mart folder |
folder="CloudTest"; |
file |
Create a data mart file |
file="CloudFile"; |
append |
Append or not |
append=true; |
setMeta |
Set attributes for data mart file |
setMeta("data",new Date(2012,9,19));//data mart file The date attribute is 2012,9,19 which can be checked based on the filter conditions of the data set in data set mart. |
param |
Transfer parameter |
param["market"]="East";//market covers all data of East. The parameter market is from corresponding data set. |
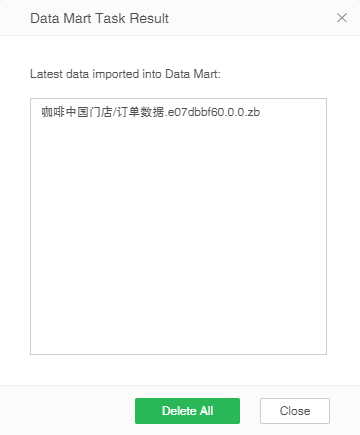
10. When the job type is "Incremental Import Data to Data Mart" and the operation is successful, after the result of the current job interface and history job interface is "successful", an icon of the data file dialog box that can trigger the import to the market will appear.

The system will automatically add time information to the data which is successfully imported into the market. Information format: "Job triggering time _ job name". For the data set in the new data mart, all data imported to the mart can be filtered via Meta information.
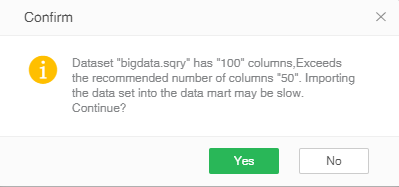
11. When selecting a data set in the current page, the recommended number of columns for the data set to enter the market is 50, and exceeding this value will indicate that it may be slow, as shown below:
❖Delete Incremental Data
In the job status page, the user is allowed to delete the data successfully imported to the mart at the last time, and reserve the imported data. If the user consecutively import data to the mart via Append mode, and data error occurred while being imported to the mart for the second time, the user can find the corresponding job execution record in the historical job status page, open the task running result dialog box, delete the data imported to the mart, and remain the other data.