|
<< Click to Display Table of Contents >> Manage Current Job |
  
|
|
<< Click to Display Table of Contents >> Manage Current Job |
  
|
❖Job Status
The job status interface shows all the created jobs. Users can use folders to organize the jobs, as shown in the following figure:
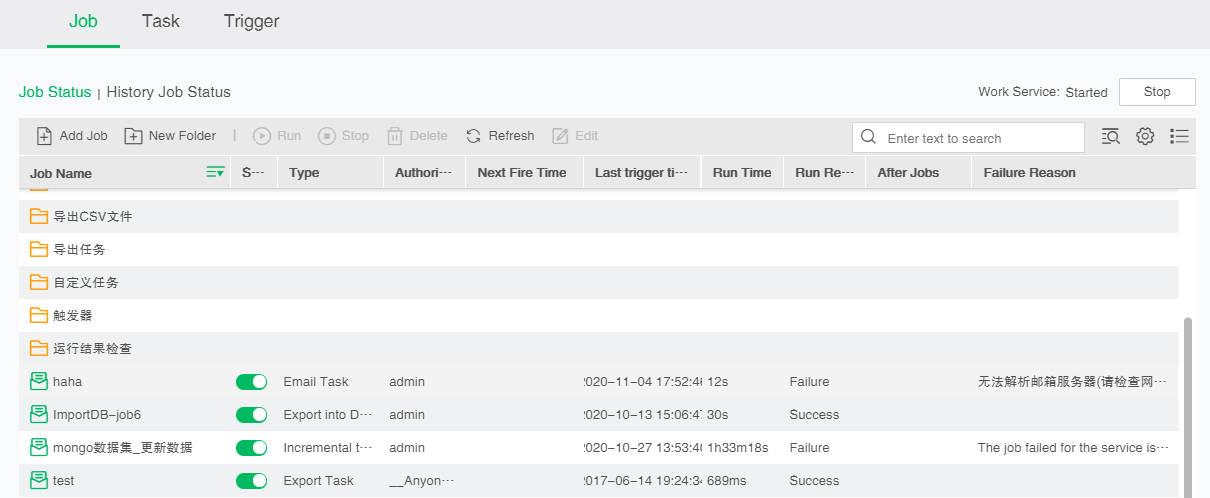
By default, the system displays the current job list in the folder view mode. Users can click the icons on the right side of the search box to change the mode "Folder View Mode![]() "or "List View Mode
"or "List View Mode![]() ". In folder view mode, the hierarchical relationship between folders and jobs is displayed. In list view mode, only all jobs are displayed, but the name of the job contains the full path to the folder where it is located. The user can click the button
". In folder view mode, the hierarchical relationship between folders and jobs is displayed. In list view mode, only all jobs are displayed, but the name of the job contains the full path to the folder where it is located. The user can click the button![]() to perform job execution reminder settings. For the configuration method, refer to Manage Scheduling Tasks -> Job execution reminder settings.
to perform job execution reminder settings. For the configuration method, refer to Manage Scheduling Tasks -> Job execution reminder settings.
The job list shows the following information of the job, users can manually adjust the column width of each column:
[Job Name] Name of the job or folder. The icons at the end of the column can be switched by clicking the "expand all folders![]() " and "collapse all folders
" and "collapse all folders![]() " icon. By clicking "expand all folders", it will show all the folders in the list, including all subfolders. After that the icon will change to "collapse all folders" by clicking which all the folders in the list, including all subfolders can be folded.
" icon. By clicking "expand all folders", it will show all the folders in the list, including all subfolders. After that the icon will change to "collapse all folders" by clicking which all the folders in the list, including all subfolders can be folded.
[Status] Job status.![]() indicates that stop the scheduled tasks.
indicates that stop the scheduled tasks. ![]() Indicates that start the task to the schedule. You can convert the status of a job, and when the status of the job is to stop the scheduled task, you can run the job manually. When the job is triggered by time, the off state will not display the next trigger time. After the restart state, the job will automatically update the next trigger time. For example, if a job runs every 2 minutes, the next trigger time is 2019-01-29 17:14:00, close the state, and restart the state when the time is 2019-01-29 17:18:15. The next trigger time for the job after restart is 2019-01-29 17:20:00.
Indicates that start the task to the schedule. You can convert the status of a job, and when the status of the job is to stop the scheduled task, you can run the job manually. When the job is triggered by time, the off state will not display the next trigger time. After the restart state, the job will automatically update the next trigger time. For example, if a job runs every 2 minutes, the next trigger time is 2019-01-29 17:14:00, close the state, and restart the state when the time is 2019-01-29 17:18:15. The next trigger time for the job after restart is 2019-01-29 17:20:00.
[Type] Job types including Multitask, export task, email task, synchronize data to data mart, incremental import data to data mart, customized task, export to csv task and export into database task. Note: Yonghong X-Suite and Y-Reporting do not support exporting to the database.
[Authorized User] The user who is authorized by the job. Note: Desktop does not support this function.
[Next fire time] Display the next time to execute the job.
[Last fire time] Display the last time to execute the job.
[Run time] The duration of the last execution.
[Run result] The result of the last execution of the job can be running, pending for running, success, failure, or cancellation. Various types of jobs can control the job execution timeout by modifying the property job.timeout in the basic parameter configuration. For details of this property, please refer to System Management -> System Setting -> System Parameters Setting.For jobs other than custom task type, you can view the progress dialog box by clicking "Running". The progress dialog boxes of incremental import data and Materialize Data Set display five steps of importing the data to data mart: Start the execution, perform data to generate DataGrid, create data files, distribute storage data files, and complete the execution. Steps to export the task include: Start the execution, get the dashboard, export the dashboard, and complete the execution. Steps to export the CSV files include: Start the execution, get the data set results, export to CSV file and complete the execution. Steps to import to database include: Start the execution, get the data set results, import to database and complete the execution. Execution steps of sending a mail include: Start he execution, get the dashboard, send the mail and complete the execution. Shows the status and time of corresponding execution steps in each step.
Example: The job is running
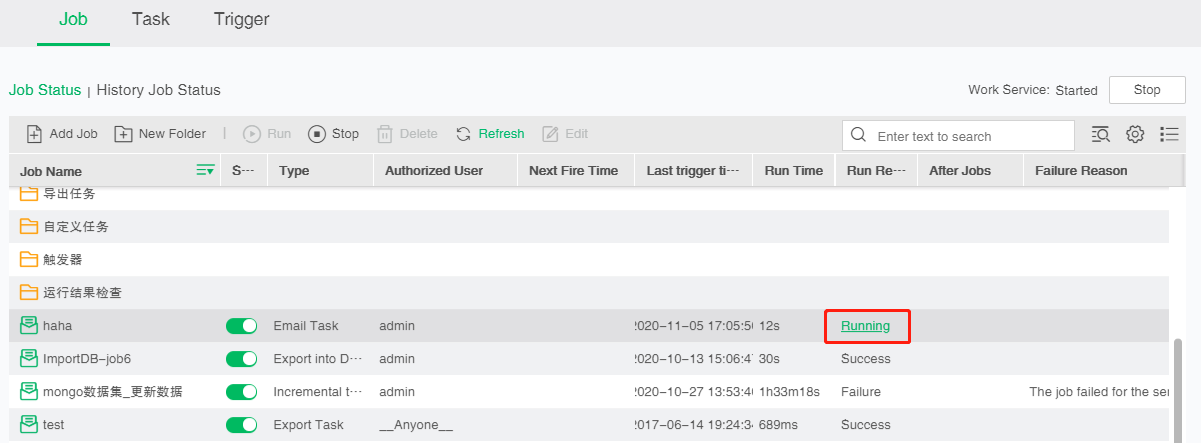
Click the "Running", pop-up task progress dialog as shown below:
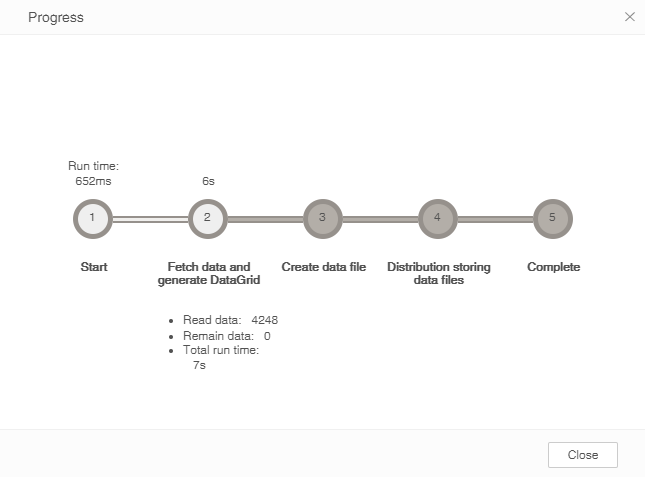
➢Description: The task dialog will display the number of read bars and the remaining bars of the dependent data set at the step 2 of incremental import data, namely perform data to generate DataGrid. The task dialog will display the number of read bars of the data set at the step 2 of synchronizing the data of data set, namely perform data to generate DataGrid. Other types of tasks will not be displayed.
If the user runs multiple jobs at the same time, and the number of concurrent tasks exceeds the upper limit, the jobs not compete for resources will be in pending for running status. The number of concurrent tasks is limited by the CPU number in License and CPU core number. The jobs pending for running cannot be stored nor deleted. They will not be cancelled for timeout. However, the running can be cancelled manually.
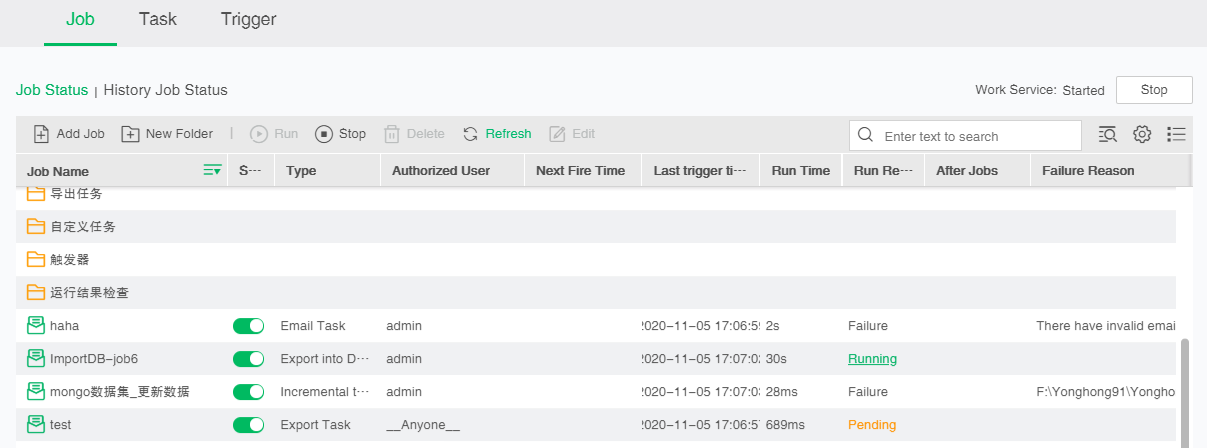
[After jobs]Display subsequent jobs setting in the job. Display following sequence successively.
[Failure reason] Display the reason for job failure.
The user can hover the mouse over a job or folder, click the ![]() button to edit, move and delete the job, rename, move, delete, create a new folder, and create a new job for a folder, as shown in the following figure.
button to edit, move and delete the job, rename, move, delete, create a new folder, and create a new job for a folder, as shown in the following figure.
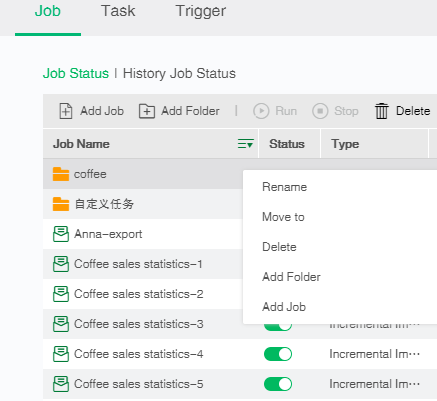
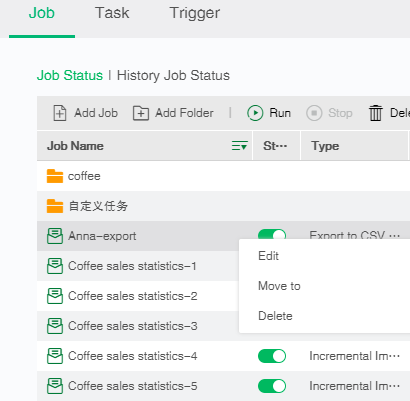
[Add Folder] Clicking New Folder at the top toolbar will automatically create a folder in the job interface. Clicking New Folder of this menu will generate a sub-folder for this folder.
[Edit] Edit and modify existing jobs. The editing function of the top toolbar supports selecting multiple folders or jobs for editing and modifying. The editing function in this menu only supports selecting one job for editing and modifying. For details on this function, please refer to Manage Scheduling Tasks -> Batch Management Scheduling Tasks.
[Delete] The top toolbar delete function supports deleting a folder or job or selecting multiple folders or jobs to delete. The delete function of this menu only supports delete a folder or job.
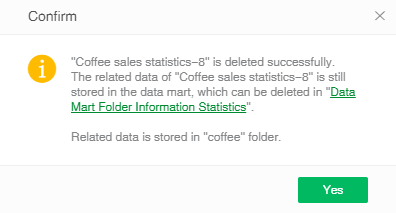
Type is incremental import data jobs or tasks, after the success of the deletion will prompt to jump to the monitoring system to delete the corresponding data mart files, such as Illustration.
[Add Job] Click "Add Job" will jump to the new job interface, "Add Job" of the top toolbar defaults to creating a job on the job interface, "Add Job" in this menu defaults to creating a job under this folder.
[Rename] You can modify the name of a folder.
[Move to] You can move the job or folder. Click the "Move to" to pop up the Storage Path dialog. The user can select the path to save and click OK.
[Refresh] Click "Refresh" to refresh the job list.
[Run/Stop] The user can manually run a job or stop a running job by clicking on the "Run" and "Stop" buttons on the top toolbar. Or you can hover the mouse over a job and click the button ![]() to run or stop the job.
to run or stop the job.